Friday 28 October 2011

motherboard

Motherboard

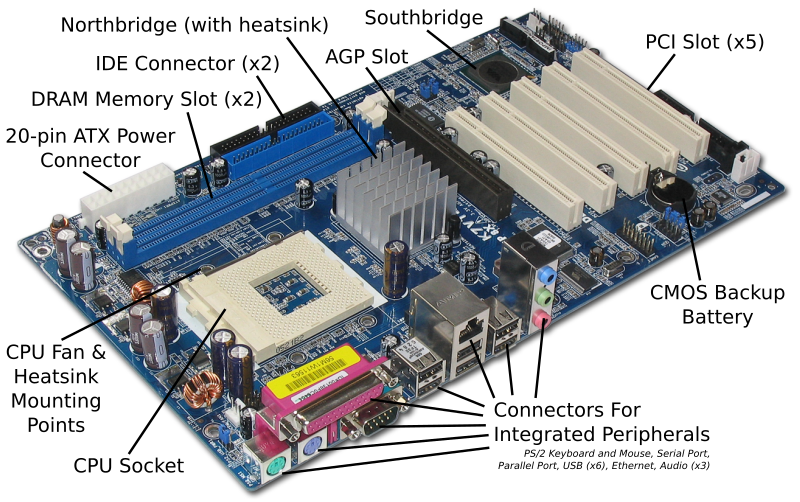
ASRock K7VT4A Pro Mainboard Labeled English.svg
Find the motherboard standoffs (spacers) that should have come with the case. They are screws, usually brass, with large hexagonal heads that are tapped so you can fasten screws into the top. These hold the motherboard up off the case preventing a short-circuit. Set these aside.
I/O Panel Shield of an ATX Motherboard
Remove the I/O Shield from the back of the case where the ports on the back of the motherboard will fit, and put in the I/O Shield that came with your motherboard. There may be small metal tabs on the inside of this face plate, if so you may have to adjust them to accommodate the ports on the back of the motherboard.
Some case styles make it difficult to install the motherboard or the CPU with the power supply installed. If the power supply is in your way, take it out and set it aside (we'll put it back in later).
Now locate the screw holes on your motherboard and find the corresponding holes on the motherboard plate (or tray) in the case. Put a standoff in each of these holes on the tray and position the motherboard so that you can see the holes in the top of the standoffs through the screw holes in the motherboard.
Now is the time to make sure the ports on the motherboard are mating with the backplate you just installed, and make any necessary adjustments. The small metal tabs are intended to make contact with the metal parts of the connections on the back of the motherboard and ground them, but you may have to bend these tabs a bit to get the ports all properly mounted, this is where those needle-nose pliers may come in handy.

CPU

CPU


An example of a CPU socket, Socket A
Installing the CPU, and the CPU’s heat-sink and fan, are by far the most difficult steps you’ll have to complete during your build. Here, more than anywhere else, it will pay to read the instructions carefully, look at the parts, study the diagrams that came with your CPU and/or third party cooling solution, and make sure you thoroughly understand what you are going to do before you try to do it. During the process, if anything does not seem to fit or make sense, put the parts down and look things over carefully before you proceed. Some operations, especially installing the heat-sink/fan combination, can require pretty firm pressure, so don’t be afraid to push a little harder if you’re sure everything is set up correctly.
The details of the installation process differ in slight but important ways for each manufacturer’s processors, and even within a manufacturers product line. Therefore, for these details, you should rely on the instructions that are provided with the CPU.
The two things that go wrong the most often and most expensively (minimum of a killed CPU, sometimes more) in building one's own computer are both related to the CPU and its cooler:
  1. Switching the computer on "just to see if it works" before adding any CPU cooling unit. Without cooling, CPUs heat up at extreme rates (a CPU heats up anywhere between ten times and a thousand times as fast as a cooking area on your stove!) By the time you see the first display on the screen, your CPU will already be severely overheating and might be damaged beyond repair.
  2. Mounting the CPU cooler improperly. Read the instructions that came with your CPU and cooler very carefully and ensure you are using all components in the correct order and correct place.
If you buy a third party cooling solution for your CPU make sure you get one that is compatible with the CPU you have. Most brands come with multiple mounting brackets that will suit many different chipsets, but it is best to check for compatibility just in case.
If using thermal paste, apply it only to the CPU die (the square piece of silicon in the middle of the CPU) and do so sparingly -- most modern CPUs take no more than a dab of thermal paste the size of a grain of rice. Some people do like to wipe some onto the heat-sink's surface and then wipe it smoothly off so that bits of it may get into tiny holes for better heat transfer. See Arctic Silver Instructions for more info on how to apply and remove thermal paste/grease. (It was written to be specifically for Arctic Silver paste, but the same techniques can be applied to other brands of thermal paste.)
If using a thermal pad supplied with your cooler, make sure you remove any protective tape from the die just before installing and do not get it dirty - and do not combine thermal pads with thermal paste, it is either one or the other. Then, check that you install the cooler in the right orientation and that you set it flat on the CPU die without exerting undue pressure on any edges or corners - the latter can make small pieces of the die break off, killing the CPU.
One option you may consider, before installing the heat-sink, is to "lap" the heat-sink, which means to smooth out the bottom surface. To do this, you will need a very flat surface; a piece of thick window glass will work. Fasten your sandpaper on the flat surface, invert the heat-sink on the sandpaper and sand in small circles, applying minimum pressure. Check frequently and when you see a uniform pattern of scratches, switch to finer grained sandpaper (the numbers go up as the sandpaper is finer, so something such as 220 is coarse while 2000 will be very fine.) Remember that you are not trying to remove any material, just polish out surface irregularities. If you get it right, you should have a surface which feels completely smooth to the touch (but don’t touch it, the oil in your fingers can cause corrosion of the fresh surface) with a mirror finish. Some companies producing heat-sinks lap the surface themselves, so if the surface already looks like a perfect mirror, leave it alone. A lapped heat-sink is more effective as it will have better surface contact with the chip.
Tighten the cooler using only the specified holding devices - if you did everything right, they will fit. If they do not fit, check your setup - most likely something is wrong. After mounting the cooler, connect any power cables for the fan that is attached to the cooler.
As an aside to the instructions above, it has been my personal experience that fitting the CPU and heat sink is best done on a supportive surface (a telephone directory on a table in my case) prior to installation, to avoid excessive flexing of the motherboard.
If you've got the CPU and its cooler installed, and the motherboard in the case, you’re over the hump, there just a few more easy pieces to go before that momentous first power-up.
Thursday 20 October 2011

client server

Client and Server Devices

Client/server networking grew in popularity many years ago as personal computers (PCs) became the common alternative to older mainframe computers. Client devices are typically PCs with network software applications installed that request and receive information over the network. Mobile devices as well as desktop computers can both function as clients.
A server device typically stores files and databases including more complex applications like Web sites. Server devices often feature higher-powered central processors, more memory, and larger disk drives than clients.

Client-Server Applications

The client-server model distinguishes between applications as well as devices. Network clients make requests to a server by sending messages, and servers respond to their clients by acting on each request and returning results. One server generally supports numerous clients, and multiple servers can be networked together in a pool to handle the increased processing load as the number of clients grows.
A client computer and a server computer are usually two separate devices, each customized for their designed purpose. For example, a Web client works best with a large screen display, while a Web server does not need any display at all and can be located anywhere in the world. However, in some cases a given device can function both as a client and a server for the same application. Likewise, a device that is a server for one application can simultaneously act as a client to other servers, for different applications.
[Some of the most popular applications on the Internet follow the client-server model including email, FTP and Web services. Each of these clients features a user interface (either graphic- or text-based) and a client application that allows the user to connect to servers. In the case of email and FTP, users enter a computer name (or sometimes an IP address) into the interface to set up connections to the server.

Local Client-Server Networks

Many home networks utilize client-server systems without even realizing it. Broadband routers, for example, contain DHCP servers that provide IP addresses to the home computers (DHCP clients). Other types of network servers found in home include print servers and backup servers.

Client-Server vs Peer-to-Peer and Other Models

The client-server model was originally developed to allow more users to share access to database applications. Compared to the mainframe approach, client-server offers improved scalability because connections can be made as needed rather than being fixed. The client-server model also supports modular applications that can make the job of creating software easier. In so-called "two-tier" and "three-tier" types of client-server systems, software applications are separated into modular pieces, and each piece is installed on clients or servers specialized for that subsystem.
Client-server is just one approach to managing network applications The primary alternative, peer-to-peer networking, models all devices as having equivalent capability rather than specialized client or server roles. Compared to client-server, peer to peer networks offer some advantages such as more flexibility in growing the system to handle large number of clients. Client-server networks generally offer advantages in keeping data secure.